General Issue Power Armor Assembly Instructions

These instructions are for the bonus General Issue Power Armor (GIPA) mini that comes in the Mechbay Wave #1 kits.


PARTS NEEDED IN THESE STEPS:


-
The parts used in this mini are from both the gray armor and weapon parts, and the black internal frame parts from its kit. It also uses the provided paperclip.
Table of Contents
Click on any of the following links to skip ahead to that step
STEP 1: Torso and Head


-
Be sure to remove support bits from torso part as shown.


-
When inserting black frame part into torso, ensure that the grooves in the back match up.


-
Note orientation of backpack when clipping onto back of torso.


-
Head should be able to turn when clipped onto torso.
STEP 2: Waist


-
Be sure to remove support bits from waist part as shown.


-
Clip waist into underside of torso. Waist should be able to turn once clipped in.
-
This next part is optional and does require the use of glue. A superglue (cyanoacrylate) is recommended. If you do not want to do this next part, skip to the legs in part 3.


-
Turn waist around to where the smooth part is facing the front.


-
Glue the small gray waist cover to the black waist.
STEP 3: Legs


-
Clip on leg to waist. Keep in mind the front of the leg has the bar at the knee.

-
Clip on other leg.
STEP 4: Arms and Guns


-
Clip on arm to torso.

-
Clip on other arm.


-
Be sure to remove support bits from the gun as shown. This is showing instructions for the Laser, but the other guns will be shown after these steps.


-
Insert gun into hand. With some guns it matters which hand they're inserted. But feel free to be creative with positioning of the gun in the hands or how they are oriented.


-
Missile Launcher


-
Recoilless Rifle


-
Machine Gun
STEP 5: Base

-
Bend the paper clip into a shape similar to shown. Straighten out most of it but leave a straight 1 1/4" (32mm) length bent.


-
Insert long end of paperclip into hole at underside of base, and have the 1.25" part snap into the two clips into the bottom of the base.

-
Cut the paperclip sticking up short to the length needed, then insert it into bottom of waist holes. You may optionally use glue.


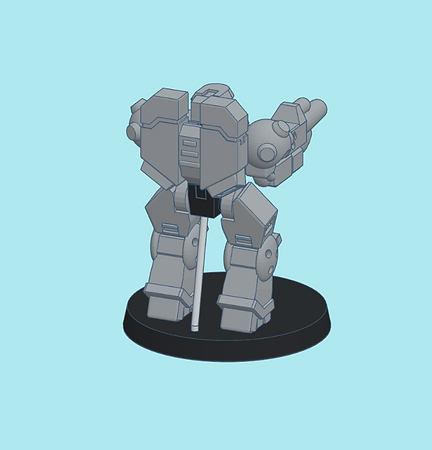
-
Your GIPA is finished.
-
Proceed to instructions on assembling your mech from its kit if you have not yet done so.

Needler

Notre Dame

Warmaul

Skullface